Linux users have long embraced the concept of personalization, but few practices exemplify this spirit better than “ricing.” While the term might sound peculiar to newcomers, it has become a cornerstone of the Linux customization community, representing the art of transforming a standard Linux desktop into a uniquely crafted computing environment.

Table of Contents
What is Ricing?
In the Linux world, “ricing” refers to the meticulous process of customizing and optimizing a desktop environment to create a personalized, visually striking workspace. The term, borrowed from car culture where “ricing” meant modifying vehicles for aesthetic enhancement, has found a new home in the Linux community.
The Components of Ricing
Desktop Environments and Window Managers
At the heart of ricing lies the choice of how windows and applications are managed on screen. Users can opt for full-featured desktop environments like GNOME or KDE, or dive into the more minimalist world of window managers. Tiling window managers such as i3, bspwm, and dwm have become particularly popular among rice enthusiasts for their efficiency and keyboard-driven control.
Visual Elements
The aesthetic aspect of ricing involves careful selection and modification of:
- Theme configurations for consistent color schemes
- Custom icon sets that match the overall design
- Font choices that enhance readability and visual appeal
- Window decorations and borders that complement the theme
System Tools and Utilities
Rice configurations often incorporate various tools to enhance both form and function:
- Conky: A highly configurable system monitor that can display everything from system statistics to weather information
- Polybar: A customizable status bar that can show system information, application states, and more
- Application launchers like dmenu and rofi that provide quick access to programs while maintaining aesthetic consistency
Configuration Through Dotfiles
The backbone of any rice setup is the collection of dotfiles – configuration files that control how different applications and system components behave. These files, typically hidden in the home directory (hence the “dot” prefix), allow users to fine-tune every aspect of their system’s behavior and appearance.
Why Rice Your Linux System?
Personal Expression
Ricing represents more than mere aesthetic modification; it’s a form of personal expression. Users can create environments that reflect their personality, work style, and visual preferences. Whether minimalist or elaborate, each rice configuration tells a story about its creator.
Workflow Optimization
Many users find that thoughtful customization leads to improved productivity. By tailoring their environment to their specific needs, they can streamline common tasks and reduce unnecessary distractions.
Learning Experience
The process of ricing provides an invaluable learning opportunity. Users gain deep insights into Linux system architecture, configuration management, and scripting as they work to achieve their desired setup.
Community Engagement
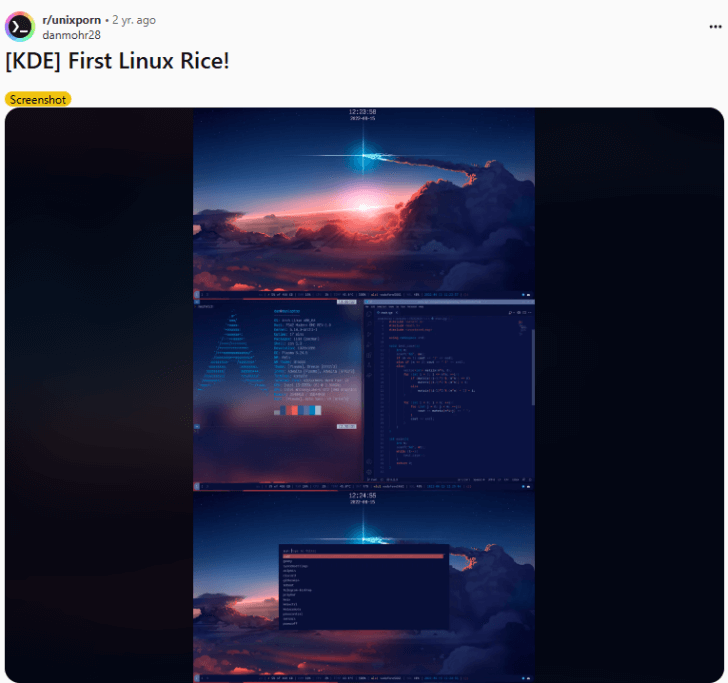
The ricing community is known for its creativity and willingness to share knowledge. Platforms like Reddit’s r/unixporn showcase countless examples of innovative desktop configurations, while community forums provide support and inspiration for newcomers and experienced users alike.
Getting Started with Ricing
For those interested in starting their ricing journey, the key is to begin gradually. Start with simple modifications to your existing desktop environment, experiment with different tools and configurations, and don’t be afraid to draw inspiration from others’ work. The Linux ricing community is built on sharing and learning from each other’s experiences.
Prerequisites
Before diving into ricing, ensure you have:
- A Linux distribution installed (Arch Linux, Ubuntu, or Fedora are popular choices)
- Basic knowledge of terminal commands
- Patience and willingness to learn
- Backup of your important data
Step 1: Choose Your Foundation
Desktop Environment vs Window Manager
Start by deciding between:
Desktop Environment (Easier for beginners)
- GNOME: Modern, feature-rich, highly customizable
- KDE Plasma: Extremely flexible, Windows-like experience
- XFCE: Lightweight, traditional desktop experience
Window Manager (More advanced)
- i3: Popular tiling window manager, great documentation
- bspwm: Minimal, flexible binary space partitioning window manager
- awesome: Dynamic window manager with Lua scripting
Step 2: Essential Tools
Package Installation
Install these basic tools to get started:
# For Ubuntu/Debian-based systems
sudo apt install git nitrogen picom rofi neofetch

# For Arch-based systems
sudo pacman -S git nitrogen picom rofi neofetch
Core Components
- Compositor (picom)
- Handles transparency and shadows
- Creates smooth animations
- Reduces screen tearing
- Wallpaper Manager (nitrogen)
- Sets and manages wallpapers
- Supports multiple monitors
- Maintains aspect ratios
- Application Launcher (rofi)
- Quick application launching
- Window switching
- Custom scripts integration
Step 3: Basic Customization
Theme Configuration
- GTK Themes
# Create themes directorymkdir -p ~/.themes ~/.icons- Download themes from gnome-look.org
- Extract to ~/.themes directory
- Apply using your desktop environment’s settings
- Icon Themes
- Download icon packs
- Extract to ~/.icons
- Select through system settings
Terminal Setup
- Terminal Emulator
# Install a terminal emulatorsudo apt install alacritty # or kitty
- Shell Customization
# Install zsh and oh-my-zshsudo apt install zsh sh -c "$(curl -fsSL https://raw.github.com/ohmyzsh/ohmyzsh/master/tools/install.sh)"
Step 4: Managing Dotfiles
Essential Dotfiles
- Create a dotfiles directory:
mkdir ~/dotfiles - Common configuration files to manage:
~/.bashrc or ~/.zshrc (shell configuration)~/.config/i3/config (i3 window manager)~/.config/picom.conf (compositor)~/.config/rofi/config.rasi (application launcher)~/.Xresources (X server settings)
- Version control your dotfiles:
cd ~/dotfiles git init# Create symbolic links to your config filesln -s ~/dotfiles/.bashrc ~/.bashrc
Step 5: Status Bars and System Monitoring
Polybar Setup
# Install polybar
sudo apt install polybar

# Create config directory
mkdir -p ~/.config/polybar

# Copy example config
cp /usr/share/doc/polybar/examples/config.ini ~/.config/polybar/
Conky Configuration
# Install conky
sudo apt install conky-all

# Create basic config
mkdir -p ~/.config/conky
touch ~/.config/conky/conky.conf
Step 6: Color Schemes
Creating a Cohesive Theme
- Choose a color palette:
- Use tools like color.adobe.com
- Find existing schemes on /r/unixporn
- Create your own using pywal
- Apply colors consistently:
- Terminal colors
- Window borders
- Application themes
- Status bar colors
Tips for Success
- Take It Slow
- Start with basic customizations
- Document your changes
- Make backups before major changes
- Learn from Others
- Study other people’s dotfiles on GitHub
- Join Linux communities on Reddit and Discord
- Share your progress and ask for feedback
- Troubleshooting
- Keep a backup terminal emulator
- Know how to reset to defaults
- Maintain a separate test environment
- Resources
- Reddit: r/unixporn
- GitHub: dotfiles repositories
- Arch Wiki: detailed documentation
- Desktop Environment/Window Manager specific wikis
Advanced Topics to Explore
Once you’re comfortable with the basics:
- Custom scripts for automation
- Keyboard shortcuts and bindings
- Advanced window manager features
- Theme creation
- Dynamic color schemes
- Custom widgets and applets
Remember that ricing is highly personal – what works for one user may not suit another. The goal is to create an environment that enhances your computing experience while reflecting your individual style and needs.


